How to Run Selenium Tests in Jenkins
In this post, I am trying to keep complete guide of Selenium Continuous Integration (End to End Integration) with Jenkins. This is a guide to implementing Continuous Integration with Jenkins, Maven, and TestNG with GitHub.
Jenkins -It is an open source tool completely written in Java. For software development services it offers continuous delivery and continuous integration.
It effectively automates your manual task of code deployment procedure from development box – QA – Stage – Production.
The basic functionality of Jenkins is to implement a predefined list of steps on the basis of managed time and some events.
Jenkins supports several plugins which you can integrate such as Git, SVN, build pipeline and many more.

How is Jenkins used with selenium?
If you need help in installing any of the tools, check the links below, which will help, independent of the OS installed on your machine.
Adding Dependencies and Plugins
For time saving purposes, I will consider you have a Java project already in place. You will need to know the repository URL of your project for further use. The IDE used is up to your decision. Make sure you add the appropriate dependencies and plugins into your Java (maven pom.xml) project, like in the example below, but remember to check if a newer version is available.
<dependency>
<groupId>org.seleniumhq.selenium</groupId>
<artifactId>selenium-java</artifactId>
<version>3.5.3</version>
</dependency>
<dependency>
<groupId>junit</groupId>
<artifactId>junit</artifactId>
<version>4.11</version>
<scope>test</scope>
</dependency>
<plugins>
<plugin>
<groupId>org.apache.maven.plugins</groupId>
<artifactId>maven-source-plugin</artifactId>
<version>3.0.1</version>
</plugin>
<plugin>
<groupId>org.apache.maven.plugins</groupId>
<artifactId>maven-compiler-plugin</artifactId>
<version>3.5.1</version>
<configuration>
<source>1.8</source>
<target>1.8</target>
<encoding>${project.build.sourceEncoding}</encoding>
</configuration>
</plugin>
<plugin>
<groupId>org.apache.maven.plugins</groupId>
<artifactId>maven-jar-plugin</artifactId>
<version>3.0.2</version>
<executions>
<execution>
<goals>
<goal>test-jar</goal>
</goals>
</execution>
</executions>
</plugin>
For those of you not familiar with JUnit, know that it’s a automation testing framework designed for the Java language. Although it was mainly used for unit tests until recently, it works very well for the interface tests with Selenium as well.
In JUnit, the class names containing the tests have to end in “Test”. In addition, all of the test cases you would like to translate into automated tests and run in a continuous environment need to be annotated with the specific JUnit annotation @Test. This allows Maven to identify the test class and run the tests inside without any additional configuration.
For this example we are going to create a UI test with the help of Selenium.
Creating a Selenium Test
At this point, we have in place almost everything we need in order to run automated tests in a CI environment. Now we only need to write a test as an example and configure Jenkins to run it. So let’s talk about Selenium Webdriver and how it should be configured. WebDriver is a tool for automating web application testing, and in particular, to verify that they work as expected. It aims to provide a friendly API that’s easy to explore and understand.
The screenshot below shows an overview of the structure of a Java project. The class named “App” hosts the code of the example-project and in the class “AppTest” we will add the needed tests.
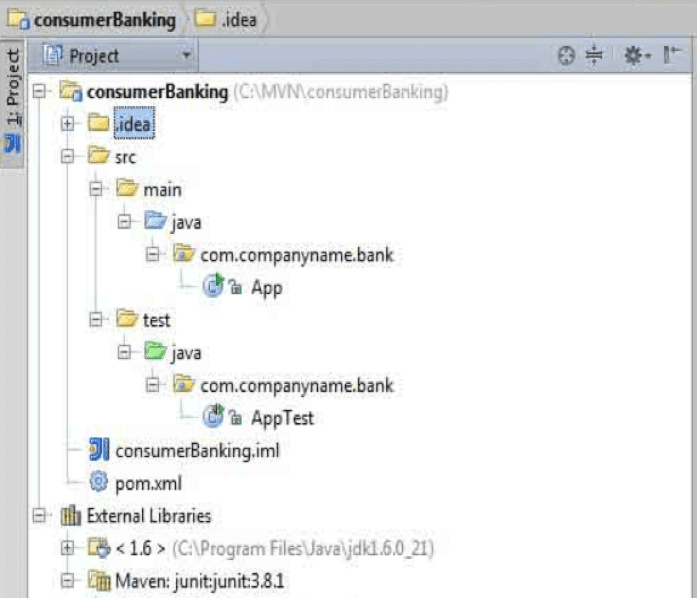
The easiest way to add Selenium Webdriver to your project is by using Maven. In the main pom.xml file add the dependency of the selenium-java artifact, like it is displayed in the screenshots above.
Selenium allows engineers to automate browser interaction through code, start different browsers, call different URLs, click links and other web elements, type text and many other things, all done through the Selenium API, which is pretty intuitive and easy to use.
The code below illustrates examples of methods from the Selenium API used in order to interact with an HTML element or verify something about it.
@Override
public void sendKeys(CharSequence... value) {
parent.sendKeys(this, value);
}
@Override
public boolean isEnabled() {
assertElementNotStale();
return !element.hasAttribute("disabled");
}
@Override
public boolean isDisplayed() {
assertElementNotStale();
return element.isDisplayed();
}
The first method sendKeys, simulates typing a string into a web element, while the other ones check if a web element is displayed or enabled (ready to interact with it). You can find more examples and description of the methods provided by the Selenium test automation API at this link.
Integrating Your Test Into Jenkins
Now that we have all the pieces in place, all we need to do is create and configure a new Jenkins plan that will run the automated tests.
For that, go to the server where Jenkins is installed, login with a valid account and click on “New Item”.

integrating the selenium test into jenkins
Enter an appropriate name for the new Job, select “Maven Project ” project and click on “Save”.

A new, empty job has been created at this point. Now, perform the following configuration steps:
Under “Source Management”, select the appropriate repository for the location of your project and pass the URL and credentials. In the below example, the repository used is Git.

Usually, if a versioning system is used in a project, there will be a structure of a main branch called master and various other branches. In Jenkins, you need to specify which branch of the project should be used, or leave blank if there is no versioning system used or it has only the main one (master).
Next, in the “Build Triggers” section, you can choose how and when the build should be triggered and run. In the example below, the build is scheduled to run on a daily basis, starting at 20:00 PM. Other options include starting the build after each commit in the project, or after another module of the project was built.


In the “Pre-steps” build section, another set of parameters can be passed to the Jenkins build. Here you will specify the Maven targets that need to be executed in order to run your test, in this case "clean test". Another parameter that is being passed in this example is the type of browser on which the tests will be run. How you can achieve that inside the Java project is the topic for another article.

Last but not least, in the configuration of a new build, Jenkins allows the possibility of notifying specified users regarding the results of a build via e-mail or the feature of archiving different artifacts generated at the end of a build. In our case it could be test results saved in an excel file, other types of test reports, screenshots taken during the execution of the tests and so on.

Now you can run the plan and see how the test code is being checked out and all the defined tests are being ran. In this example, the server which hosts the AUT (application under test) is defined as a parameter within the Java project, but that doesn’t mean it couldn’t be stored as a variable and passed to the Jenkins plan like a parameter.


Thank you for sharing valuable information
ReplyDeleteSoftware testing company in Malaysia
Manual software testing company in Malaysia
Automation software testing company in Malaysia
Thanks for sharing this informative article on how to run selenium tests in jenkins in details. If you have any requirement to Hire Selenium Testing Services for your project. Please visit us.
ReplyDelete